Monday, February 25, 2008

Pants Directions, Including no side seam by Camelotcats

Origianally found at: http://www.disboards.com/showpost.php?p=23433064&postcount=681

There's a really easy way to make pants with or without a side seam, as long as it's for a kid, or pajama pants.
To make pants with a side seam:Cut 4 rectangles of fabric.
The measurements are:
Width: 1/4 the hip measurement (Or waist measurement, whichever's bigger) of the person the pants are for plus 2.5" (3.5" for an adult)
Length: Outseam measurement (waist to ankle) plus 2.5"
Put two rectangles right sides together and cut a "J" out of one top-side of both rectangles.
The J should be about 9-10" high and 2" deep. Similar to the cut out of a peasant top arm-hole. (does this make sense??)


sew the "j"'s together.

Do the same thing on the other 2 rectangles
.Open up both sets, and line up the pants with the J's in the center, and sew up one leg and down the other.
Then sew together the ouside seams.
I then serge all of the raw edges....you could turn them over once or zig zag if you don't have a serger.
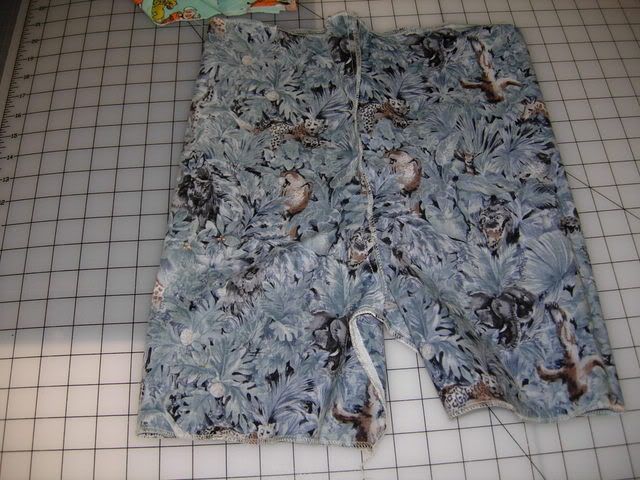
Turn under .5" at the top ans sew down, then turn under 1" and sew that down leaving room for elastic (or a waistband). use 3/4" elastic or a drawstring fo the waistband.
I Did take a pic of my FAVORITE tool for feeding drawstrings and/or elastic:

Hem legs.
The safety pins are to attach the tool tot he elastic, since it doesn't feed through the "eye".I hope these pics help!! I have to get back to my sewing!!ETA: Oh!! the way I remember that the curvy part is the crotch, is the CURVE has to go over a tushie (which is curvy). That way I sew the correct parts together.
For Side seam free pants:Make TWO rectangles, the same length as above and twice the width as above.
Put the two rectangles right sides together and cut the "j"'s on BOTH top corners of the rectangles.
Sew both sets of J's together.
open up the pants with the J's lined up in the middle, and sew up the inside seams.
Do the waistband the same, and hem.
Clear as mud?
The pants are pretty unconstructed, and on adults can be prettty wide-legged.
I do this for all of my kids pants and shorts.
I hope this wasn't too confusing.
The "j" is harder to explain than it is to do.

Thursday, February 21, 2008

Soda Pop Crock Pot Chicken (WW Core)

DIET CHERRY VANILLA DR. PEPPER CROCK POT CHICKEN
4-8 Chicken breasts
1/4 tsp salt
1/4 tsp pepper
1 cup Diet Cherry Vanilla Dr. Pepper
1 cup kethup
1/4 cup lemon juice
3 tbs worcestershire sauce
3 tbs brown sugar twin
1/2 tsp ground ginger
1/2 tsp garlic powder
1/2 tsp onion powder
Mix everything but the chicken together and add it to the crock pot. Brown the chicken in a little bit of oil first and then put it in the crock pot. Cook it in the crock pot until it's done. I took the chicken out and put it on a plate, then transferred the sauce into a saucepan and boiled it until it thickened up. Then, I spooned a little on top of the chicken. It was REALLY good! My husband even really liked it and he doesn't like "weird stuff".

Weight Watchers Core Recipe

Saturday, February 16, 2008

Sunday, February 10, 2008

Corset Top Faux Lacing Directions by LisaZoe


 Cut the front piece 1/2 the length of measurement A plus 3" for ease
and seam allowance. The width is equal to measurement C plus
1.25" for seam allowance. Cut this into two equal pieces down the
center widthwise.
 Cut the insert panel 4" wide and the length of measurement C plus
1.25" for seam allowance.
 With panel section right side up, place pieces of ribbon in a crossing
pattern as shown in illustration. Pin in place once you're satisfied with
the layout and baste stitch.
 Attach one half of front piece to each side of the panel and press
seams away from panel. Topstitch if wanted.
 Trim sides of completed front section so it is 1/2 the length of
measurement A plus 3" for ease and seam allowance. Make sure the
inserted panel is centered before cutting. Following illustration, cut
armscye (I fold my fabric in half widthwise so I can cut both at once).
Cut a second piece identical in size and shape for the lining.
 Once the top is completely assembled, I sometimes add a bow sewn
to the center of the bottom ribbon in the inserted panel. This is
optional but adds to the illusion of lacing.

Thursday, February 7, 2008

Zuma Wrap Pants by:Camelotcats

Wrap pants:Measure the person who will be getting the pants at their waist, their hip, and their thigh. Take a pattern for a pair of pants that fit the recipient and trace the inside crotch seam and inner-leg seam to the ankle hem.At the waist, go out 1/2 the waist measurement minus 1 inch for every 10 inches the waist is after the first 10 inches. (For example, if the waist is 22", go out 10" from the center seam, if the waist is 32", go out 14", etc.) You can round this number up OR down as desired (usually the smaller sizes I round up, the bigger, down). Depending on the fullness desired for the pants, you can either go straight down from the point at the waist or you can taper or curve in at any point to change the shape of the wrap. This is a very free-form thing, but never go below 1/4 the thigh measurement plus 2-3" (or 1/4 hip plus 2-3" above the crotch point), or the sides of your leg won't be covered. The more coverage you make on the sides of the pants, the more your leg will be covered on a regular basis, otherwise when you walk, the pants will flap open and flash your leg. I tend to make less coverage adn let my legs come out, but then again, I only have one pair of these that I made as a swimsuit cover-up.If you want the little wrap in the front like the zuma pants have, make the back pant pieces 1/2 the waist plus about 4 or 5 inches. At the hip, severely curve inwards (Towards the inner leg seam) to about 1/4 the hips plus 3 or 4 inches for overlap, then curve back out at the lower thighs/knees like the pants pattern does for the bell on the bottom. The front pieces (which wrap underneath) don't need to be fancy. Also, if there is too much fabric at the tushie (since the fabric will nearly all the way back to the center in the back), you can make the front pieces 1/2 waist minus 2 or 3 inches so the fabric ends at the side of the tush instead of going all the way into the middle underneath. If you want to wrap either way, though, make the front pieces like the back but without the overlap.The actualy pattern of the Zuma pants looks like they use the severe swoop from the waist to the hips to avoid bulk at the tushie. I had never seen this before until I looked at the pattern, but it is a very neat idea. I think it could be imitated with a little trial and error without needing a whole different pattern.At the bottom hem, round off from the outseam to the hemline so there's not a sharp corner.Cut out 2 fronts and 2 backs, remembering that the front will wrap around and tie in the back and the back will wrap around and tie in the front...Sew the pants together at the crotch and inseams just like you would for a regular pair of pants.Using double fold bias, bind the outseam down over the hem and up the other outseam (Does this make sense?). This will finish your raw edges. If you want to, you could also turn under all of these raw edges. OR you could make them reversible and cut 4 fronts and 4 backs and sew them together with right sides and trun inside out before attaching the waist.Now, for your waist, you can do one of three things (Actually you can do more, but these are the basics):1. Bind the tops with the bias leaving long tails on either side of the pants to tie around the waist. 2. using matching or contrasting fabric, make two long strips. attach the strips to the waist leaving long tails on either side. (there are many ways to do this, I'm sure your way is better than mine as mine involves a lot of hand top-stitching).An option with each of the above methods for a cleaner back:On the front part of the wrap pants, measure the ties that will go around to the back. make the entire waistband with the extra tails the waist measurement plus 4-6 inches (for larger waists, you may want to make it +8"). clean finish the ends of the tails and attach either buttons, snaps, or velcro to go under the back of the pants, instead of another tie.3. You can make the tops of the pants a little longer and thinner with the top being closer to the waist plus a few inches, similar to the Zuma pants, then either bind the top or put on a waist band, leaving no extra for tails. Then attach buttons, snaps, or velcro to the ends, so when you overlap the extra length you can attach them together. (this method does involve some sort of curving out below the waist and above the crotch to avoid bunching up at the center)

Corset Top by LisaZoe


Get these measurements of your child (see illustration):
A. around the chest
B. from underarm to 1-2" below the waist
C. from 1-2" below the waist to where the upper edge of the top will be
D. across the top of the chest, about where the upper edge of the top will
be
E. over shoulder from about where the upper edge of the top will be in
front to just below underarm level in the back (this is for straps)
 Cut the front piece 1/2 the length of measurement A plus 3" for
ease and seam allowance. The width is equal to measurement C
plus 1.25" for seam allowance. Following illustration, cut armscye (I
fold my fabric in half widthwise so I can cut both at once). Cut a
second piece identical in size and shape for the lining.
 Cut the back piece the length of measurement A and width of
measurement B plus 1.5" for seam & hem allowance.
 Cut bottom ruffle twice the length of A plus 1.25" for seam
allowance and 3.5" wide to allow for a ruffle about 2.5" wide plus
hem and seam allowance. Sometimes I can do this in one piece
cut across width of fabric but sometimes I need 2 pieces of equal
length (the length of A plus 1.25" for seam allowance).
 Cut 2 straps the length of measurement E plus 1.25" for seam
allowance and 3.5" wide.
 Hem the top edge of the back by folding over 1/4" then folding again 1/4". Press and then stitch in place. Do the first row
of shirring stitches about 3/4" from hemmed edge and then approximately every 3/4" stopping about 2" from bottom
edge. I back stitch the start and end of each row plus hand tie the elastic in knots every two rows.
 Fold strap pieces lengthwise with right sides together, stitch the length of each strap, turn rightside out, press with seam
centered on what will be the back side of the straps.
 Pin straps to main top piece along upper edge approximately 1"
from outer edge. For best results the straps should be angled

slightly so once they are attached they will angle away from the
neck (see illustration). With strap pieces in place and front pieces
right sides together, stitch along top edge and both armscyes.
 Sandwich shirred back section between two front pieces making
sure right side of back faces right side of main front piece and hem
of back section is at underarm. Pin the 3 pieces together along
side seams and stitch. Turn rightside out and press along seam.
 Stitch side seams of ruffle piece(s) and hem along bottom of ruffle like back section was hemmed. Baste along top edge
of one half the length of the ruffle along seam line and then again 1.4" from edge. Note: The ruffle will only need to be
gathered along half the length since it will be sewn to the back section without gathering (the shirring of the back will
casue the ruffle to look gathered). Pin in place to the bottom edge of the main top pieces and stitch. Press along seam
toward main section and topstitch if desired.
 At this point I think it's easiest to have your child try on the top so you can pin the straps in place in the back or at least
mark where you'd attach them and the final length. I usually hem the bottom edge of the straps to give them a nice edge
then stitch them to the back along at least two of the shirring lines. I don't stretch out the shirring so it gets stitched over
and is not longer stretchy in those places but it works.
 Sit back and take pride in what you've created. :-)

Autograph Bag by buffy0214


The bags are 10 3/4 x 8 3/4; pocket 4 1/2 x 7 1/4
The backpack is 10 3/4 square. I made it for a 3.5 year old, so you may need to adjust size.
I cut an old piece of 12x12 scrapbook paper to size to make a pattern. for each bag you will need:
1/2 yard of fabric-for bags cut four squares and 1 pocket; for backpack cut four
squares (you can also get 1/3 yard for outside and 1/3 for lining if you want you
lining to be different)
fusible batting (kinda like felt with fusible backing); Cut 2 the same size as bags for each bag.
Also, you will need at least 1 yard of the lanyard (measure how long you want it to
be and add about 4 inches) and some sew on velcro.


Sewing Directions:
1) Iron fusible batting to 2 outside pieces and pocket piece
Pocket
2) Turn top of pocket down 5/8; top stitch on outside at 1/2
3) Turn sides in 5/8; press. Pin to center front of purse, bottom is even with purse bottom. Stitch sides of pocket to purse front close to edge.
Purse
*hint: when sewing through batting, you might need to increase stitch length* Sew at 5/8 unless otherwise mentioned.
4) Pin purse front to purse back, right sides together. Stitch sides and bottom. Trim edges.
5) Line up side seam with bottom seam until you get a corner edge. Stitch 1 inch down (looks like a triange after stitching). Do the same to the other corner. This adds fullness to the purse. I didn't trim this in order to add stability.


Lining
6) Sew velcro tab in center of both sides of lining, 1 1/4 inch from top.
7) Pin lining front to back, right sides together. Stitch sides. Sew bottom but don't
sew it closed. You need a hole in the middle to turn the purse. So, sew from each side edge towards the center. Repeat step 5 above for purse only.


Add lining to purse
8) Turn purse right side out. Lining should be inside out. Put the purse inside the lining so the right sides are together; Pin top and stitch.
9) Turn the purse through the hole in the lining. Every thing showing should be right sides.
10) Stitch the hole in the lining closed
11) Put lining inside purse. Top stitch 1/4 on top of purse.


Lanyard
12) Cut lanyard to size. I fray-checked the edges but not sure if it was needed.
Turn each edge under 1 inch and sew to purse at sides near top. I put mine just below the top-stitching.
For backpack, cut lanyard in half. Skip step 2 & 3. Before starting step 4, pin lanyard to backpack front, about 2 inches up, even with raw edge of side. Do this with both sides. Continue step 4.


Skip step 5.


At step 12 I pinned the lanyard about 2 1/2 inches in from sides, and about 1 inch from top.

Ruffle Hints by Various Disers

Measure out the width you want the ruffle and double it - then cut. You will need to make sure that the material you cut is a lot longer than the width of your outfit since you want it to ruffle. Put your machine on the longest stitch and sew the edges together. BE SURE AN DON'T BACK & FORWARD STITCH BECAUSE YOU WILL BE PULLING THE THREADS. Start out by making the hanging strings longer than normal since you are going to pull them. Sew all the way to the end of the fabric and cut the strings longer. DON'T BACK AND FORWARD STITCH ON THE OTHER END EITHER! Take one end of the ruffle and find the string that will pull through the fabric the easiest. Pull it little and then move the material along to ruffle it. Do this the whole length of your fabric. Be careful not to pull to hard b/c strings can break and you will have to start all over. When you get your ruffle how you want it, pin to the garment and sew on.
_____________________________________
I do my ruffles a little different. I do measure the garment hem or wherever for the length I need. So if my skirt measures 40 inches I cut enough for 80. I sew the ends of the ruffle together and make a big loop. I pin my 2 edges(seams) to match the garment, then I pin only the center and 2 or three places on either side of the center line. This way when I'm sewing I just gather it as I go along
_________________________________________
RUFFLES - I do the same idea kind of but I use dental floss. Sew it on with zigzag, going over the floss, then pull the floss at the end. Pin and sew.
___________________________________________
I have a Gathering "trick" that produces the most beautiful gathers and ruffles. I use 3 gathering threads, one on the seam, one above and one below. That way, after you gather it up you have 2 holding rows keeping your gathers just perfect as you sew. This keeps the garment looking "handmade" instead of "homemade" It does take an extra minute or so, but it looks better than any other way. They turn out perfect.

Ribbon Belt by TheDizMom


I took red grosgrain ribbon in 1 1/2" width and white in 1" width and sewed them together with black thread, so there is a small line of black on the edge of the white. Then I bought a set of small Mickey themed stamps and using black fabric markers on the stamp alternated Mickey and Minnie faces along the white ribbon. I then folded the completed ribbon in half, tucked in the loops and sewed it up with red thread. I made the ribbons long enough to fold in half so both sides of the belt were the same and when the ribbon is pulled through the loops it looks identical. It was so easy and took me only about 2 hours, and that was with constant interruptions from my DD and having bobbin problems with my machine. I just think it's so fun and why can't we moms have something custom made too. I like it so much I think I am going to have to make one for myself ! Now my kids want one too.

Ruffled Dora Pants and shirt- Chim Chiminy


I kind of made it up as I went.................I made the ruffle first, hemming the bottom edge of the fabric and machine finishing the other raw edge, so it wouldn't fray. Then I ran the gathering stitch that others talked about on here. Oh, and I sewed the sides of the fabric together so it was like a tube or a cuff. Gathered the fabric. I cut off about four inches from the bottom of the jeans. I then fit the gathered fabric to the jean and sewed it on.Then I placed the grosgrain ribbon over the top of the fabric, where it met the jeans, and stitched both edges of the ribbon (top and bottom) with a straight stitch. I used two strips of the grosgrain.
It was super simple, and I hope I explained it clearly. I made sure to finish all edges so fabric and denim wouldn't fray. And for the shirt, I sewed on the ribbon the same way. With the bows, again I made it up as I went, so it made sense to me. I put fraycheck on the ends of the ribbons for the bow so they won't unravel.

Pillowcase Halter Dress by AKsunshine


Cut out the dress. After I cut the arm holes, I cut the back so that it
was about 1.5 " above the lowest part of the holes. I folded this over
and made a casing just wide enough for my elastic, also making it at
the same level now as the lowest part of the holes. I cut the elastic
about as wide as the outside of her shoulder blades, knowing it
would sit lower and not need to be as wide as say half way around
her rib cage. I stitched the edges of the casing and elastic together
really well. Then I made a 1" casing on the front and pulled through
coordinating ribbon. I used grosgrain, 1.5".

Layered Tulle Dress by a Diser (if this is yours, please post!)


I took my daughter's waist measurement and
doubled it for the width of the skirt, then I
measured how long I wanted it and cut my
fabric, adding enough for seam allowances on
both sides and the top and bottom (add enough
for elastic casing.)
Then I sewed up the sides and hemmed the
bottom.
Next, I cut the tulle to the length I wanted (a
few inches shorter than the skirt) then I
gathered the tulle and sewed it a couple inches
from the top of the skirt. I drew a line with
sewing chalk for placement.
Next, I cut the top fabric a couple inches shorter
than the tulle, lined up the raw edges of the top
and bottom fabric, folded over for the elastic
casing and sewed that, leaving an opening to
thread the elastic through, then thread the
elastic and sew up the opening.

Marshamallow Fondant Icing by Kstgelais4


Here is the recipe I use. Super easy. It's kind of like edible playdough. My kids love playing with the scraps..
.A very tasty alternative to buttercream icing or regular fondant.Read the full instruction and photos here!
16 oz white marshmallows
2 tb water2 lb icing sugar (approx. 8 cups confectioners' or powdered sugar)(DO NOT USE ALL OF THE SUGAR)
1. Melt marshmallows and water in a double boiler or microwave.Heat until melted.
2. Place half of the sugar in a bowl. Make a well in the middle.Pour melted marshmallow in and mix.
3. Add remaining sugar and continue kneading. (add more powedered sugar in tablespoons as you are kneading. Micture should not be sticky)TIPS---grease your hands and the bowl.Also, let this stuff rest overnight.It will be pretty stiff when you try to knead it again, but it can be microwaved for five to ten seconds (start off with 5) and it will soften right up and be perfect for rolling out and playing with.
Discard all the crusty residues.
TO USEif fondant is too hard, place about 30 sec. in microwave. Dust work table with cornstarch, and knead for a couple of minutes.Then roll as thin as you want with rolling pin dusted in cornstarch. To avoid it from stickin to your work surface, turn rolled dough frequently, and continue dusting with cornstarch until you have reached desired thinnes.To color: Separate small amounts of fondant & color with paste food colours to the desired tone. Knead until colour is smooth and completely uniform.This fondant does not set fast at all. When you have formed your flowers, set them on a curved surface so they don't loose their shape (hang them upside down) It will not be as perfect as Gum Paste, but it will work. Also, start making flowers at least two days in advance to allow them to set.

Wednesday, February 6, 2008

Lisa Zoe Stripwork skirt Directions


Quote:
Originally Posted by tadamom
I have a question for you....when you make your strips for the skirt is the top of your strips narrower than the bottom? If so what measurements do you use? TIA


Answer by LisaZoe:

I make mine wedge shaped rather than rectangles. What I did was use the markings on my cardboard cutting board (the kind that's about $15 and folds out to about the size of a twin size mattress). It has a section with curved lines that make up a wedge of a circle. I decide the approximate size I want for the top of the wedge and start there to make the wedge the desired length. For these, the bottom width of the wedge is about three times that of the top. I like doing wedges because it allows for a lot more twirl at the bottom without having a lot of gathered fabric where it attaches to the bodice. I've created a few wedge "templates" to use so I use fabric as efficiently as possible. Here's an example of how they'd be layed out on a length of fabric. Of course, it doesn't work out as well with fabric that has an obvious direction to the print.

Sunday, February 3, 2008

Applique on Knits by LouiesMama

Posted by LouiesMama:
I found some pics of some simple appliques I did when Louie was a baby. Here is a Nemo set:

They were really easy to do - I just ironed heat n bond lite on the back of a scrap of the character fabric, cut out a square around the character, ironed it onto the background scrap, and ironed heat n bond lite to the back of that. Then I used my clear quilters ruler to mark the lines for the second square (usually 1/4" from the edges of the first square), cut along the lines, and fused the layered square to the top. This is before I knew how to satin stitch on knits, so I just zig-zagged - fast and cute! Just make sure you use a ball point needle!Carla

Organized Sewing Room by The_Seamstress

Posted by TheSeamstress: I got fed up with just sewing out of a roll-out/fold-away-desk ... so, I took over an "extra" room ... It was small, so it got filled up very fast ...I got fed up again.I emptied the room, made new desks & shelves, put it all back ...NOW, it's fine. =) I just hope we don't have to move anytime soon! (this is a 12'by12' room)